







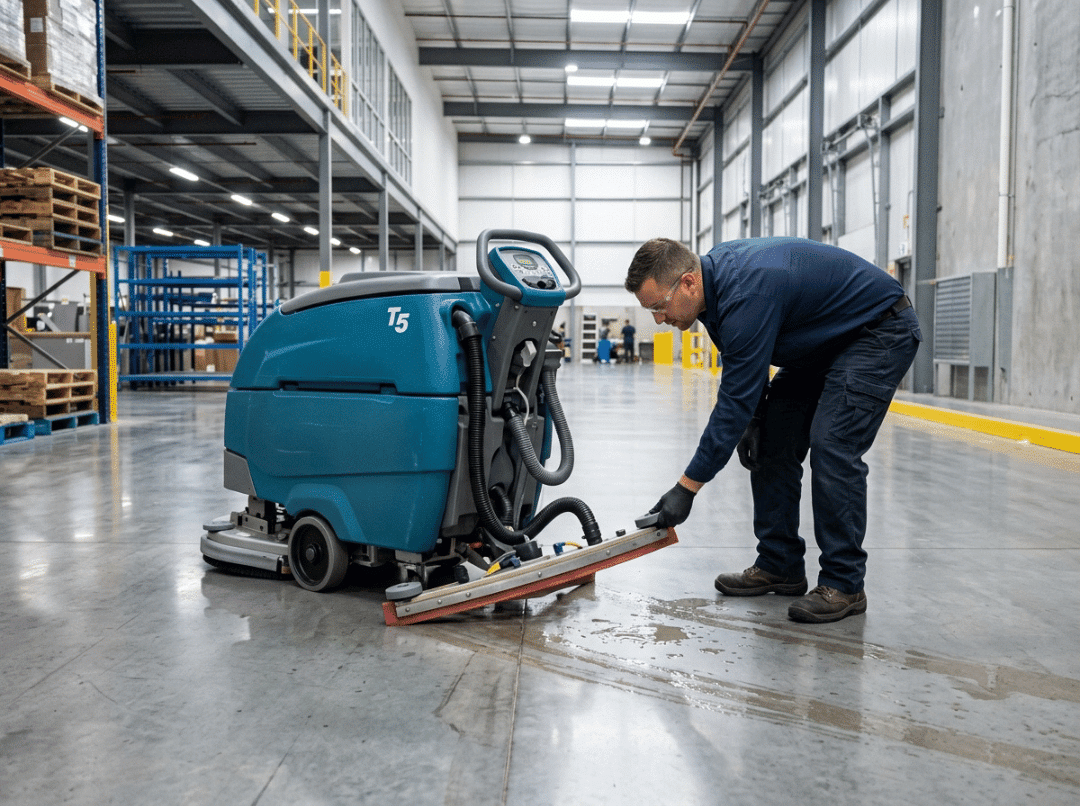
A commercial floor scrubber that quits mid-shift doesn’t just leave floors wet. It stalls your crew, disrupts your cleaning schedule, and—in warehouses, retail stores, and healthcare facilities—creates real safety and compliance risks within minutes.
Here’s what most operators don’t realize: the vast majority of floor scrubber failures trace back to a handful of preventable causes. A clogged solution filter. A worn squeegee blade. A loose Anderson connector. A battery that was never fully charged. These aren’t equipment failures—they’re maintenance gaps, and they’re fixable.
This guide is built for facility managers, cleaning supervisors, and lead operators who need to diagnose problems fast and make smart decisions about what to fix, what to replace, and when to call a technician.
How to use this guide: Start with the Diagnostic Flow section to identify which system on your machine is failing. Use the Quick-Diagnosis Table to jump straight to your symptom. Then go to the 12 problems below—the four highest-impact issues get deeper treatment because they account for the most downtime in real commercial environments.
How to Diagnose a Floor Scrubber Problem Before You Replace Any Parts
The most expensive mistake in floor scrubber maintenance isn’t neglecting the machine—it’s replacing parts before confirming the actual cause.
A new vacuum motor won’t fix weak suction caused by a clogged hose. A battery replacement won’t solve a charging failure caused by a damaged Anderson connector. Misdiagnosis wastes money and still leaves the machine down.
Before you order anything or call a technician, run through this three-step check.
Step 1: Name the Symptom Precisely
Don’t start with “the machine isn’t working.” Ask yourself exactly what it’s doing or not doing:
- Is water not being picked up, or not being put down?
- Is the machine not starting, or does it start and then shut off?
- Is the vacuum running but weak, or completely silent?
- Is the machine moving but not cleaning, or not moving at all?
Each answer points to a different system. Most commercial floor scrubbers have four:
|
System |
What It Controls |
Fails When… |
|---|---|---|
|
Solution System |
Water flow, solenoid valve, filter, supply hose |
No cleaning solution reaches the floor |
|
Recovery System |
Squeegee, vac hose, float switch, vac motor, recovery tank |
Dirty water isn’t being picked up |
|
Power System |
Batteries, charger, cables, connectors, circuit breakers |
Machine won’t run or dies too quickly |
|
Drive & Brush System |
Traction motor, brush motor, controls, belts, couplings |
Machine won’t move or brushes won’t spin |
Step 2: Check the Five Most Common Causes First
In commercial environments—warehouses, retail stores, schools, healthcare facilities—more than half of all reported floor scrubber problems come down to one of these five things:
- Recovery tank is full — triggers automatic vacuum shutoff
- Solution filter is clogged — stops water flow entirely
- Squeegee blade is worn or dirty — causes streaking and poor water pickup
- Battery wasn’t fully charged before the shift — causes short runtime or loss of brush and vacuum function
- Drain cap is open or loose — kills suction even when the vacuum motor is running fine
Check these before anything else. If one of them is the issue, you’ll have the machine back in service in minutes.
Step 3: Use a Voltmeter Before Replacing Any Electrical Component
A digital voltmeter is the most valuable tool for floor scrubber troubleshooting. Before assuming a battery, motor, or charger has failed:
- Test the full battery pack under load (with the vacuum motor running)
- Test each battery individually to find a weak cell
- Test for voltage at the motor terminals before assuming the motor is dead
- Test the wall outlet before blaming the charger
What the readings mean:
A 24V pack should read above 24V under load. Individual 6V batteries should read at least 6.1V under load. If the pack reads 25V at rest but drops to 20V with the vacuum running, the batteries are failing—not the charger. This single test saves a lot of unnecessary part orders.
Quick-Diagnosis Table: Match Your Symptom to the Fix
|
Symptom |
System |
Check First |
Common Fix |
|---|---|---|---|
|
Dirty water trails behind the machine |
Recovery |
Squeegee blade edges |
Flip or replace blade |
|
Machine leaves water but vacuum sounds fine |
Recovery |
Drain cap, recovery tank level |
Secure cap, empty tank |
|
No cleaning solution coming out |
Solution |
Solution filter screen |
Remove and rinse filter |
|
Solution flow is weak or uneven |
Solution |
Solenoid valve wiring |
Reconnect wires, clear valve debris |
|
Battery dies within minutes |
Power |
Charger amp reading, terminal corrosion |
Clean terminals, load-test battery |
|
Machine won’t charge at all |
Power |
Anderson connector, outlet, breaker |
Reseat connector, reset breaker |
|
Streaks across the full floor width |
Recovery |
Debris between squeegee blades |
Disassemble and clean squeegee |
|
Streaks only at edges or only in middle |
Recovery |
Squeegee pitch adjustment |
Adjust pitch per operator manual |
|
Brush or pad not spinning |
Drive & Brush |
Charge level, brush circuit breaker |
Charge machine, reset breaker |
|
Vacuum won’t turn on |
Recovery |
Full tank, float switch position |
Empty tank, free float switch |
|
Machine shuts off during a shift |
Power |
Battery voltage under load |
Test battery pack, check connections |
|
Puddles or dripping under the machine |
Solution |
Drain cap, solenoid valve |
Secure cap, clean or replace valve |
|
Machine won’t move or drives weakly |
Drive & Brush |
Charge level, drive circuit breaker |
Charge machine, reset drive breaker |
|
Error codes on display |
Electrical |
Operator manual first |
Look up code, inspect connectors |
|
Floors look dirty after scrubbing |
Solution + Recovery |
Pad type, chemical dilution, operator speed |
Match pad, check dilution, slow down |
12 Common Floor Scrubber Problems: Causes, Diagnosis, and Fixes
The problems below are ordered by commercial impact. The first four receive extended treatment because they create the most downtime across warehouses, distribution centers, retail stores, and institutional facilities. Problems 5 through 12 are real and worth knowing—but they’re less complex to diagnose and usually have shorter fix paths.
Problem 1: Floor Scrubber Not Picking Up Water
This is the single most disruptive problem in a commercial cleaning operation. A large ride-on or walk-behind scrubber leaving water behind on a smooth warehouse floor or a polished retail surface creates immediate slip hazards and doubles your cleanup time. In healthcare, it’s a compliance issue.
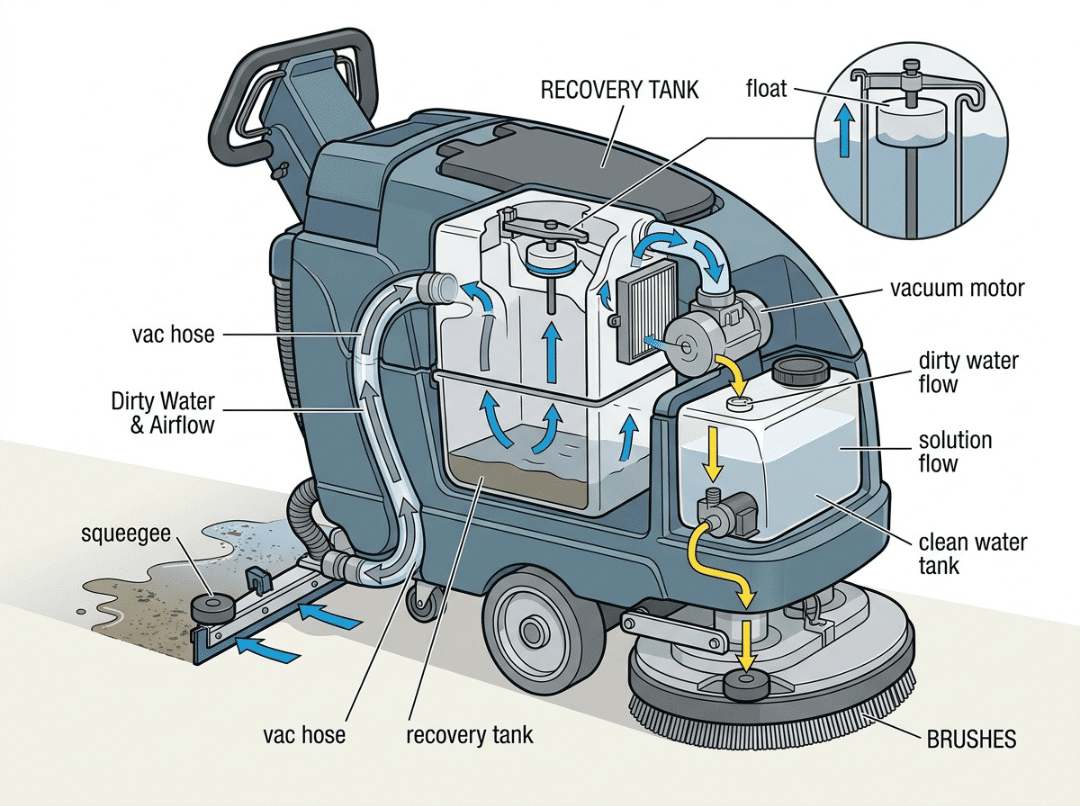
What this symptom usually means: The recovery system has broken down somewhere between the squeegee and the vacuum motor. But that’s a wide range—and most of the time, the motor is the last thing that’s actually failed.
Symptoms: Water trails behind the machine after a full pass; the vacuum sounds like it’s running, but suction is weak or absent; the floor stays wet even when the machine makes multiple passes.
Check These First—In Order
1. Is the recovery tank full?
Most machines cut the vacuum automatically when the tank fills. In a long commercial shift—especially in a heavily soiled facility—the tank can fill faster than expected. Empty it and test again before doing anything else.
2. Is the drain cap fully sealed?
An open or loosely capped drain hose lets outside air into the recovery tank, collapsing suction. This is more common than most operators realize. The cap should be snug with no gaps.
3. Disconnect the vac hose from the squeegee and feel for suction at the open end.
- Strong suction at the hose? The problem is the squeegee, not the motor.
- Weak or no suction at the hose? The problem is upstream—the hose itself, the tank seal, or the motor.
This one test splits your diagnostic path in two and saves significant time.
4. Inspect the vac hose for clogs, cracks, or kinks.
Debris can lodge further in than you’d expect. Run a broom handle through the full length. Check where the hose connects to the recovery tank—not just the squeegee end. Also look for hairline cracks; these are hard to see but cause significant suction loss.
5. Check the recovery lid gasket.
A cracked or deformed gasket between the recovery tank lid and the tank body creates a slow suction leak. Press firmly around the lid during operation—if suction improves, the gasket needs replacing.
6. Inspect the squeegee blades.
Worn, rounded blade edges cannot form a proper seal against the floor. Flip the rear blade to a fresh edge. Most rear squeegee blades have four usable edges. If all four are rounded, replace the blade.
7. Check the squeegee pitch.
If the machine picks up water in the center but leaves wet edges, or picks up at the edges but not the middle, the squeegee pitch is out of adjustment. Consult your operator manual. Most pitch adjustments take under two minutes and require no tools.
8. Test the vacuum motor—only after ruling out everything above.
Use a voltmeter to test for the correct voltage (24V or 36V) at the motor terminals. Voltage present, motor won’t run? The motor needs replacing. No voltage at the motor? Trace the circuit back through the switch, relay, and float switch before assuming motor failure.
Possible causes: Worn or improperly seated squeegee blades · clogged or cracked vacuum hose · open drain cap · full recovery tank · stuck float switch · cracked recovery lid gasket · failed vacuum motor
Prevention tip: Remove and rinse the squeegee after every use. Keep a spare vacuum hose and a fresh set of squeegee blades on hand. In multi-shift commercial operations, inspect squeegee blade edges twice per week—don’t wait for streaking to start.
Problem 2: Floor Scrubber Not Dispensing Cleaning Solution
In commercial environments, a machine that scrubs dry might look like it’s working, but it isn’t cleaning. In healthcare, food service, and school settings where hygiene standards are non-negotiable, this is a compliance failure, not just a performance issue.
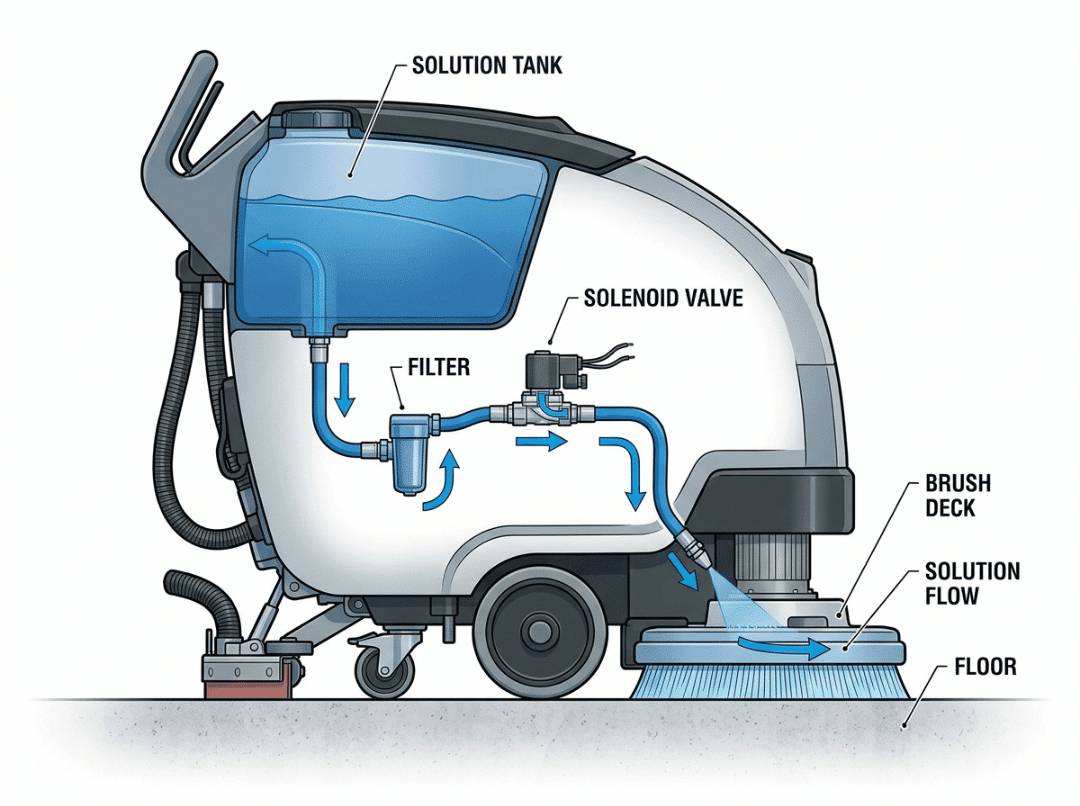
What this symptom usually means: Something between the solution tank and the floor is blocked or disconnected. Nine times out of ten, it’s the filter.
Symptoms: Brushes spin, but the floor stays dry; solution flow is uneven or comes out as a trickle; machine dispenses nothing even when the tank is full.
Check These First—In Order
1. Is the solution tank actually full?
In high-turnover operations, operators sometimes start a shift on a nearly empty tank. Check the level directly before assuming a mechanical problem.
2. Is the flow control set to minimum or off?
Many machines have a flow rate dial. In facilities trying to reduce chemical usage, operators sometimes turn it down and forget to reset it. Check the dial position before anything else.
3. Remove and rinse the solution filter screen.
This is the most common mechanical cause of no-flow. The filter bowl sits inline between the tank and the solenoid valve. Drain the tank, unscrew the bowl, pull the screen, and rinse it under running water. Reinstall and test. This takes about three minutes.
4. Check the solenoid valve.
Most solution valves have exactly two wires. If one is disconnected, no water flows. Reconnect it and test. If both wires are connected and the valve still won’t open, inspect the valve body for debris—this is particularly common if the machine has ever been run without the filter screen installed. Debris lodges in the valve seat and prevents full opening. The same debris can also prevent full closure, causing the valve to drip constantly even when the machine is parked.
5. Trace the solution supply hose.
A kinked, pinched, or split hose between the tank and the brush head blocks flow entirely. Follow the hose along its full route, including any areas where it’s routed around corners or through tight spaces.
Possible causes: Clogged solution filter (most common) · debris-blocked solenoid valve · disconnected or damaged valve wiring · empty tank · kinked or split supply hose · flow dial set to off or minimum
Prevention tip: Clean the solution filter screen every week without exception. Never run the machine without the filter screen installed—anything that bypasses it goes directly into the solenoid valve. Keep a spare filter bowl in your supply kit, as filter bowl plastic becomes brittle over time and can crack without warning.
Problem 3: Floor Scrubber Battery Dies Too Fast or Won’t Charge
Battery and charging problems are the leading cause of commercial floor scrubber downtime, particularly in operations running multiple shifts. The core diagnostic challenge: a failing battery and a faulty charger look identical on the surface. Both result in the machine dying too fast. The fix is completely different.
What this symptom usually means: Either the batteries can no longer hold a sufficient charge under load, or the charging system isn’t delivering a complete charge in the first place. You need to determine which one before spending money.
Symptoms: Machine runs for only a few minutes before losing brush and vacuum function; machine won’t power on after overnight charging; charger shows no amp reading; runtime has been gradually declining over several weeks.
First: Determine Whether It’s the Battery or the Charger
|
Symptom Pattern |
More Likely Cause |
|---|---|
|
Machine dies fast, batteries are 2–3+ years old with daily use |
Aged battery pack |
|
Machine dies fast, batteries are less than a year old |
Charging problem or charger fault |
|
Charger shows zero amp reading from the start |
Connector, outlet, or charger failure |
|
Charger display shows “bat” or a fault code |
Anderson connector not making contact |
|
Individual batteries fail voltage test under load |
Cell failure within the pack |
|
All batteries test fine individually, but runtime is still short |
Charger not completing a full charge cycle |
Diagnosing Battery Runtime Problems
Step 1: Confirm the charge was actually complete.
An onboard SPE-type charger should start at 15–20 amps and slowly trickle down to 0.0A when complete. An external Lestronic-type charger behaves the same way. If you’re unplugging the machine while the charger still shows charging amps, the battery hasn’t finished charging. This is extremely common in shift-change handoffs.
Step 2: Load-test the pack.
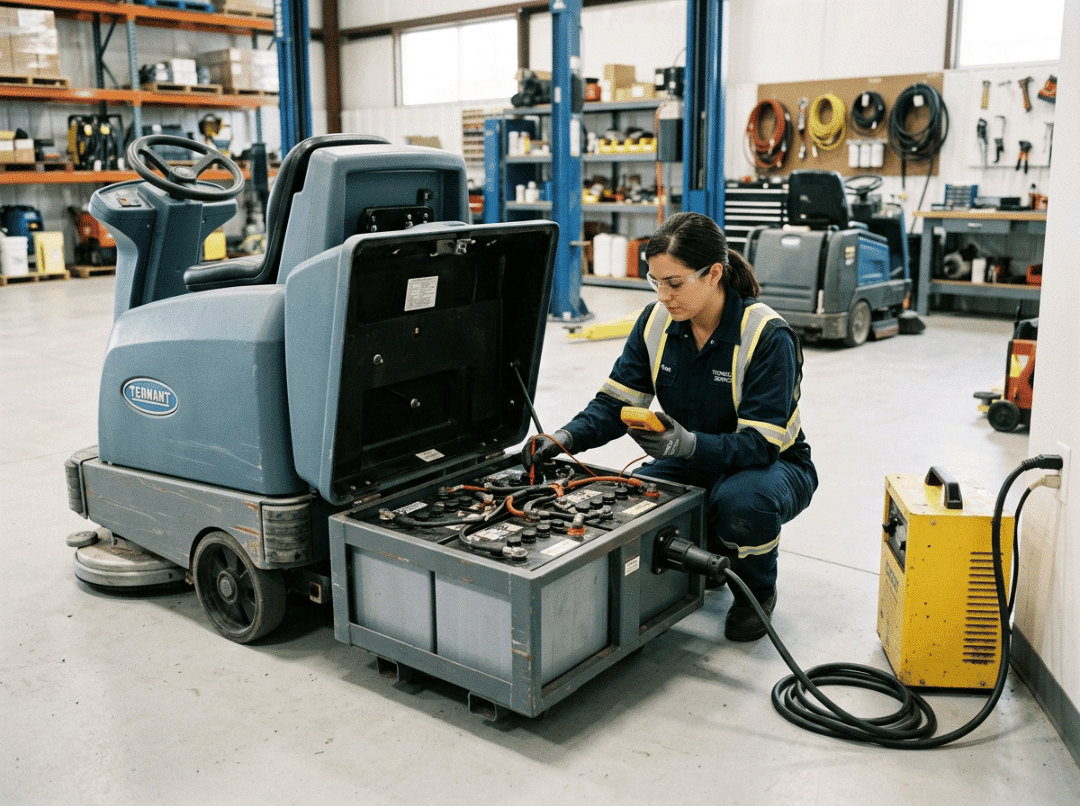
Turn on the vacuum motor to put a load on the battery, then test the full pack with a voltmeter. A 24V pack should stay above 24V under load. A pack that reads 25V at rest but drops to 20V or below with the vacuum running is failing and needs replacement.
Step 3: Test each battery individually.
On a 24V machine with two 12V batteries, test each under load. On machines using four to six 6V batteries, test each one separately. A single weak cell drags the whole pack down. Any 6V battery reading below 6.1V under load is at end-of-life.
Step 4: Inspect cables and terminals.
Corrosion on battery terminals increases electrical resistance and reduces both charging efficiency and discharge performance. Remove the cable clamps, inspect the terminals, and clean light corrosion with a wire brush. Replace cables with heavy corrosion or damaged insulation—they can’t be reliably cleaned back to spec.
Diagnosing Charging Problems
Check the Anderson connector first.
The Anderson plug connects the battery pack to the charger (or in onboard systems, to the charger circuit). If your charger display shows “bat,” the connector isn’t making full contact. Inspect the metal contacts inside the housing for pushed-back pins, debris, or cracked plastic. Fully seat both sides of the plug and test again.
Test the outlet.
A tripped breaker or dead outlet is frequently overlooked. Plug in a different device or use a voltmeter to confirm the outlet is live before suspecting the charger.
Confirm the charger is delivering current.
On chargers with indicator lights rather than displays: flashing yellow or amber typically means active charging; red indicates a fault; solid green means charge complete. If you see red from the moment you plug in, suspect the connector or the battery pack itself.
Possible causes: Aged deep-cycle batteries · corroded battery cables or terminals · batteries sulfated from storage in a discharged state · low electrolyte in flooded lead-acid batteries · loose or damaged Anderson connector · tripped circuit breaker or dead outlet · failing onboard or external charger
Prevention tip: Charge fully after every use without exception. Leaving batteries in a partially discharged state overnight is one of the fastest ways to shorten their lifespan. Check electrolyte levels in flooded batteries monthly and top off with distilled water if the plates are exposed. In daily commercial use, plan for battery replacement every 2–3 years. With good maintenance and lighter use, 4–5 years is achievable.
Problem 4: Floor Scrubber Leaving Streaks on the Floor
Streaks are a high-visibility failure. In retail environments, streak marks left behind by the cleaning machine look worse than no cleaning at all. In healthcare settings, visible streaking raises immediate concerns during inspections. In schools and office buildings, it generates tenant complaints that fall back on your team.
What this symptom usually means: The squeegee isn’t sealing evenly against the floor along its full length. The pattern of the streaks tells you exactly where to look.
Symptoms: Thin lines of dirty water remain after each pass; the machine picks up the center but leaves the edges wet; or the machine picks up the edges but leaves the middle damp.
Read the Streak Pattern Before Touching Anything
The location and pattern of the streaks is diagnostic information. Don’t skip this step:
Streaks only at the edges: The blade edges are worn or the squeegee pitch is too flat. Water spills past the ends of the blade.
Streaks only in the middle: The squeegee is bowing or the pitch is too steep. The center of the blade is lifting off the floor.
Streaks across the full width: Debris is packed between the inner and outer blades, lifting the entire blade off the surface. This is the most common type and the easiest to fix.
Thin parallel lines: The blade has nicks or cuts from debris on the floor. The blade needs replacement, not adjustment.
Uneven streaks that change day to day: The blade tension knob is loose, allowing the inner blade to shift position during use.
How to Fix It—Step by Step
- Remove the squeegee assembly completely from the machine.
- Pull out the inner blade and clean all debris, grit, and residue from between the blades. Don’t just rinse—scrub the channel. Packed debris is the culprit in most full-width streak complaints, and this step alone resolves the majority of cases.
- Inspect all four edges of the rear blade. If the edge in current use is rounded, flip the blade. Most rear squeegee blades offer four usable edges before replacement is needed.
- Reseat the inner blade fully and tighten the tension knob so it can’t shift during operation.
- If streaks are edge-only or center-only after cleaning, adjust the squeegee pitch. Your operator manual will specify the adjustment points. Usually two or three small adjustments and a test pass are enough to dial it in.
- If the blade has visible nicks or cuts, replace it. A damaged blade cannot be adjusted into acceptable performance.
Possible causes: Worn or rounded squeegee blade edges · debris packed between blades · squeegee pitch out of adjustment · loose blade tension knob · nicked or cut blade from floor debris
Prevention tip: Wipe and inspect the squeegee at the end of every shift. Don’t wait for streaking to appear before rotating blade edges—by the time you see streaks, the blade has already been underperforming for a while. In multi-shift operations on large smooth floors, squeegee blade edges typically need rotation every 2–4 weeks.
Problem 5: Floor Scrubber Brush or Pad Not Spinning
What this symptom usually means: Low battery voltage is the first suspect—the brush system is often the first function to drop out when the pack is running low. If the machine is fully charged and the brushes still won’t spin, look at the brush circuit breaker before suspecting the motor.
Symptoms: Brush motor is silent after the machine powers on; brushes spin weakly and don’t generate cleaning action; brushes fail to engage despite the function being activated.
Check these first:
- Confirm the machine has a full charge. Low voltage disables the brush system before most other functions on commercial scrubbers.
- Locate the brush motor circuit breaker and check if it’s tripped. Reset it and test.
- Inspect the brush driver and pad holder for wear. If the pad is slipping on the driver rather than spinning with it, the pad holder needs replacing.
Possible causes: Low battery voltage · tripped brush circuit breaker · worn brush driver or pad holder · broken belt or damaged drive coupling · faulty brush switch, relay, or control board
How to fix it: Confirm full charge first. Reset the brush breaker. Inspect the mechanical drive components. Test for correct voltage at the brush motor terminals—voltage present with no motor rotation means the motor needs replacing; no voltage means trace the circuit back through the switch and relay.
Prevention tip: Remove brushes from the machine after each use to prevent flat spots from forming during storage. Inspect drive couplings and pad holders during monthly maintenance.
Problem 6: Vacuum Motor Not Running
What this symptom usually means: Before assuming motor failure, check the three automatic shutoff conditions that trigger on almost every commercial scrubber. These exist to protect the motor and the machine—and they’re frequently the actual cause.
Symptoms: Vacuum function is engaged but nothing happens; vacuum turns on briefly then immediately cuts out; suction is completely absent with no sound from the motor.
Check these first:
- Is the recovery tank full? Most machines cut vacuum power automatically when the tank fills. In a long shift or a particularly dirty facility, the tank fills faster than expected.
- Is the vacuum circuit breaker tripped? Locate it on the machine and push it in if it’s popped out.
- Is the float switch stuck in the “full” position? The float switch tells the machine the tank is full even when it isn’t. Debris around the switch housing can hold it in the up position. Clean it and confirm it moves freely.
Possible causes: Full recovery tank · tripped vacuum circuit breaker · stuck or broken float switch · wiring fault or loose connector · burned-out vacuum motor
How to fix it: Empty the tank, free the float switch, reset the breaker—then retest. If the vacuum still won’t run, test for correct voltage at the motor terminals. Voltage present with no motor operation means replacement. No voltage means trace the wiring through the switch, relay, and float switch circuit.
Prevention tip: Empty and rinse the recovery tank at the end of every shift. Clean the float switch housing weekly to prevent debris buildup from causing false “full tank” readings.
Problem 7: Machine Shuts Off During a Shift
What this symptom usually means: This is almost always a power system problem. Intermittent shutdown mid-shift is one of the clearest signs of a battery pack that can no longer sustain load over time—even if it appeared charged at the start of the shift.
Symptoms: Machine starts and runs normally, then loses power after several minutes; the pattern repeats when the machine is restarted; shutdown happens earlier and earlier as the shift progresses.
Check these first:
- Was the battery actually fully charged, or was the machine only plugged in briefly before the shift?
- Does voltage drop severely under load? Test the pack with a voltmeter while the vacuum is running.
Possible causes: Aging battery pack that can’t sustain load · incomplete charging before the shift · loose or corroded connections increasing resistance · motor or controller overheating and entering thermal protection · full recovery tank triggering automatic shutdown
How to fix it: Load-test the battery pack. A severe voltage drop under load (below 20V on a 24V system) confirms battery failure. Also check that cooling vents on the motor housing aren’t blocked, clean and tighten all battery connections, empty the recovery tank, and clear any displayed fault codes.
Prevention tip: Establish a charge-after-every-use policy without exceptions. In multi-shift operations, rotating pre-charged battery packs between shifts is more reliable than relying on a single pack to recover during a short break.
Problem 8: Floor Scrubber Is Leaking Water
What this symptom usually means: In most cases, the drain cap isn’t fully sealed. Check this first—it’s the cause far more often than operators expect.
Symptoms: Puddles under the machine while parked; solution dripping during operation; unexplained solution loss between tank fills.
Possible causes: Open or missing drain cap · cracked solution or recovery tank · split or damaged supply hose · solenoid valve debris preventing full closure · loose hose fittings
How to fix it:
- Inspect the drain cap. Press it firmly and ensure it’s fully sealed.
- Trace all hoses for splits, cracks, or loose fittings at connection points.
- Check the solenoid valve for constant dripping. Debris in the valve seat prevents it from closing fully. Clean the valve body or replace the valve if cleaning doesn’t resolve it.
- Inspect both solution and recovery tanks for hairline cracks, especially near fittings and seams.
Prevention tip: Check the drain cap is fully seated before every use. Keep the solution filter in place to prevent debris from reaching the solenoid valve and causing the valve seat to leak.
Problem 9: Poor Cleaning Performance Despite Normal Operation
What this symptom usually means: The machine is running, but the setup is wrong for the floor or the soil level. In commercial cleaning, this is more often a process issue than a mechanical one.
Symptoms: Floors look dull, hazy, or visibly dirty after a full scrubbing pass; chemical smell is present but floors don’t look clean; results vary significantly between operators.
Possible causes: Wrong pad or brush type for the surface and soil level · insufficient down pressure · dirty or worn brushes and pads · cleaning solution diluted incorrectly · operator moving too fast for heavy soil
How to fix it:
- Match pad aggressiveness to the actual floor type and soil condition. A white polishing pad will not clean a heavily soiled concrete warehouse floor, regardless of chemical concentration.
- Increase down pressure if the machine offers adjustment.
- Replace worn brushes and clean or swap dirty pads.
- Verify chemical dilution against the product label. More chemical is not always better—incorrect dilution can leave residue that makes floors appear dirty even after scrubbing.
- Slow down on heavy soil. The machine requires adequate dwell time to work effectively.
Prevention tip: Maintain a pad-and-chemical pairing reference chart for each floor type your team cleans. Review it during new operator onboarding to prevent setup errors from becoming chronic cleaning failures.
Problem 10: Floor Scrubber Won’t Move or Drive Properly
What this symptom usually means: As with brushes, the drive system is often the first casualty of low battery voltage. Check charge level before suspecting the traction motor.
Symptoms: Machine doesn’t move when the throttle is engaged; machine drives only in one direction; machine moves but with noticeably less force than normal.
Check these first:
- Is the machine fully charged? Drive systems fail before other functions when voltage is low.
- Is the drive circuit breaker tripped?
Possible causes: Low battery voltage · tripped drive circuit breaker · worn or faulty throttle control handle · loose or damaged drive wiring · traction motor failure
How to fix it: Confirm charge level. Reset the drive breaker. Test the throttle and control handle for proper response. Inspect drive wiring and connectors. If all of these check out, test for voltage at the traction motor terminals before assuming motor failure.
Prevention tip: Keep batteries charged and inspect control handle wiring during scheduled maintenance. Early signs of drive problems—sluggishness or inconsistent response—are easier to diagnose and repair than full traction motor failures.
Problem 11: Error Codes or Intermittent Electrical Faults
What this symptom usually means: Don’t skip the operator manual. Most commercial floor scrubber error codes map directly to a specific system or component, saving you significant diagnostic time. Intermittent faults that don’t follow a pattern are often caused by loose wiring—particularly in machines that work on rough or uneven surfaces.
Symptoms: Error codes on the display panel; functions that flicker or operate inconsistently; machine behaves differently in different environments or at different temperatures.
Check these first:
- Look up the error code in your operator manual before doing anything else. The code often names the problem directly.
- Inspect wiring harnesses and connectors, especially in areas exposed to vibration or moisture.
Possible causes: Loose or corroded wiring connections · blown fuse or tripped breaker · moisture or corrosion on the control board · failing sensor · faulty control panel
How to fix it: Always start with the error code. Inspect all connectors in the affected circuit. Check fuses and breakers. Clean corroded contacts with electrical contact cleaner. For persistent control board faults after basic checks, contact a qualified technician—guessing on board-level repairs creates more problems than it solves.
Prevention tip: Keep the machine away from pressure washing. Store in a dry location. Inspect wiring connections during monthly maintenance, paying particular attention to any connections near areas where water, cleaning solution, or debris accumulates.
Problem 12: Gradually Declining Performance Across Multiple Shifts
What this symptom usually means: Unlike sudden failures, gradual performance decline usually points to a combination of small maintenance gaps compounding over time—not a single failed component. This pattern is especially common in high-use commercial environments where machines run multiple shifts daily.
Symptoms: Machine performs inconsistently shift to shift; cleaning quality has slowly declined over several weeks; runtime is slightly shorter than it used to be; suction seems weaker than when the machine was newer.
Most likely causes: Squeegee blade slowly rounding without replacement · recovery tank not fully rinsed, leading to buildup around the float switch · battery terminals accumulating corrosion gradually · solution filter becoming partially clogged between weekly cleanings
How to fix it: Treat this as a full maintenance reset. In one session:
- Replace or fully rotate squeegee blades.
- Flush and rinse the recovery tank completely.
- Remove and clean all battery terminals.
- Remove and rinse the solution filter screen.
- Load-test the battery pack to establish a new performance baseline.
In most cases, gradual inconsistent performance returns to normal after a complete maintenance reset. If it doesn’t, use the baseline voltage test to determine whether the battery pack is the next component that needs attention.
When to Repair a Floor Scrubber—and When to Replace It
Not every floor scrubber failure is worth fixing. In commercial cleaning operations, downtime has a real cost, and the right decision isn’t always repair.
Repair usually makes sense when:
- The machine is under 5 years old and has been reasonably maintained
- The problem is isolated to a single component: a motor, a charger, a battery pack, or a squeegee
- Replacement parts are readily available and reasonably priced relative to the machine’s current value
- The repair can be completed quickly enough to minimize crew downtime
Replacement or rental often makes more sense when:
- The machine is more than 7–10 years old and requires multiple simultaneous repairs
- The control board or drive system has failed on an older model where parts are discontinued
- Battery replacement cost approaches 30–50% of the cost of a comparable refurbished machine
- The machine’s capacity no longer matches your facility’s current cleaning requirements
- Recurring failures are consistently pulling your team away from productive work
A practical decision rule:
If the estimated repair cost exceeds 50% of the cost of a comparable refurbished machine, replacement typically makes better business sense. Factor in not just the part cost, but labor, anticipated downtime, and the realistic likelihood of the next failure—older machines rarely stop failing after one repair.
Preventive Maintenance Schedule for Commercial Facilities
The majority of floor scrubber failures described in this guide are preventable. This schedule is designed for operations where machines run daily across warehouses, schools, retail facilities, or healthcare buildings.
After Every Use
- Empty and rinse the recovery tank completely
- Remove the squeegee and rinse blades and the blade channel
- Inspect the float switch for debris and confirm it moves freely
- Plug in the charger and verify it’s actively charging (confirm amp reading or indicator light)
- Wipe down the exterior and check for visible leaks or damage
Weekly
- Remove and rinse the solution filter screen
- Inspect all hoses for cracks, kinks, and loose fittings
- Check squeegee blade edges—flip or replace if rounded
- Wipe down battery terminals and inspect for corrosion buildup
- If runtime has felt shorter than usual, load-test the battery pack
Monthly
- Inspect Anderson connectors and all wiring connections
- Check electrolyte levels in flooded lead-acid batteries; top off with distilled water if plates are exposed
- Full load-test of each individual battery in the pack with a voltmeter
- Inspect brush drivers, pad holders, drive couplings, and recovery tank lid gaskets
- Clear dust from motor cooling vents
Annually or by Hours of Operation
- Full battery pack evaluation and voltage baseline test
- Squeegee blade replacement (or sooner based on wear)